Plantar Fasciitis Taping
Kinesiology taping is a safe and effective treatment method, especially when used in conjunction with other conservative treatments like cold compression and blood flow stimulation.
Taping is an easy way to provide your plantar fascia with comfortable support and protection during your daily activities. The lightweight, breathable tape targets your plantar fascia tissue to provide compression and help prevent re-injury.
There are many different applications out there for Plantar Fasciitis. You can find various videos and taping guides online. Here are two applications that we recommend:
Option 1

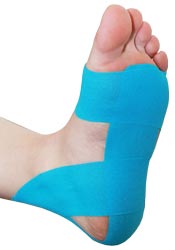
1. Take one full length piece of tape (about 10 inches) and tear the backing off one end, anchoring it to the ball of your foot (right beneath your toes), using no stretch.
2. Using 75% stretch, pull the tape along the sole of your foot and over your heel, continuing up the back of your heel and ankle.
3. Lay the end of the tape down using no stretch and rub it in to ensure sticking.
4. Take another full length piece of tape and cut it in half so you have two pieces that are each about 5 inches long.
5. Take one of the 5 inch strips and tear the backing in the middle, peeling it away so you are holding onto the two anchor ends.
6. Apply the 5 inch strip horizontally across the Metatarsals on the bottom of your foot, using 50% stretch in the middle and no stretch at the ends.
7. Take another full length piece of tape and tear the backing off one end, anchoring it on the inside of your ankle, just above your ankle bone, using no stretch.
8. Use 25% stretch to pull the tape down the side of your ankle and around the bottom of your foot to the opposite ankle bone, placing the end down with no stretch.
9. Rub the tape in to ensure sticking.
Option 2

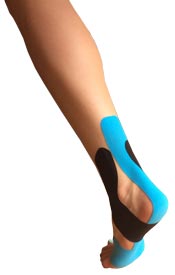
1. Take one full length piece of tape (about 10 inches) and tear the backing off one end.
2. With no stretch, anchor the tape on the bottom of your foot, just below your toes.
3. Peel the rest of the backing off and, using 50% stretch, pull it down the length of your foot and up the back of your heel and ankle, laying down the end with no stretch.
4. Take another full length piece of tape and tear the backing off one end.
5. Using the untorn end, measure around to the opposite (outside) part of your foot, under the heel and up the inside part of the ankle.
6. Using no stretch, anchor the tape just above your inside ankle bone, according to how you measured it.
7. Peel the rest of the backing off and, using 80% stretch, pull the tape around the bottom of your heel and up to the opposite side of your ankle.
8. Lay down the end of the tape with no stretch.
9. Take another full length piece of tape and tear the backing off one end.
10. Using no stretch, anchor the tape behind where the previous piece was first anchored, but at an angle so it's pointing towards the arch of your foot.
11. Peel the rest of the backing off and use 80% stretch to pull the tape around the bottom of your foot and up to the opposite side of your ankle.
12. Lay down the end of the tape with no stretch.
13. Rub the tape in to ensure sticking.